Introduction
When I first visited Hawaii, I had my very first spam musubi — warm rice, salty Spam, and nori all wrapped together into one perfect bite. It became an instant favorite.
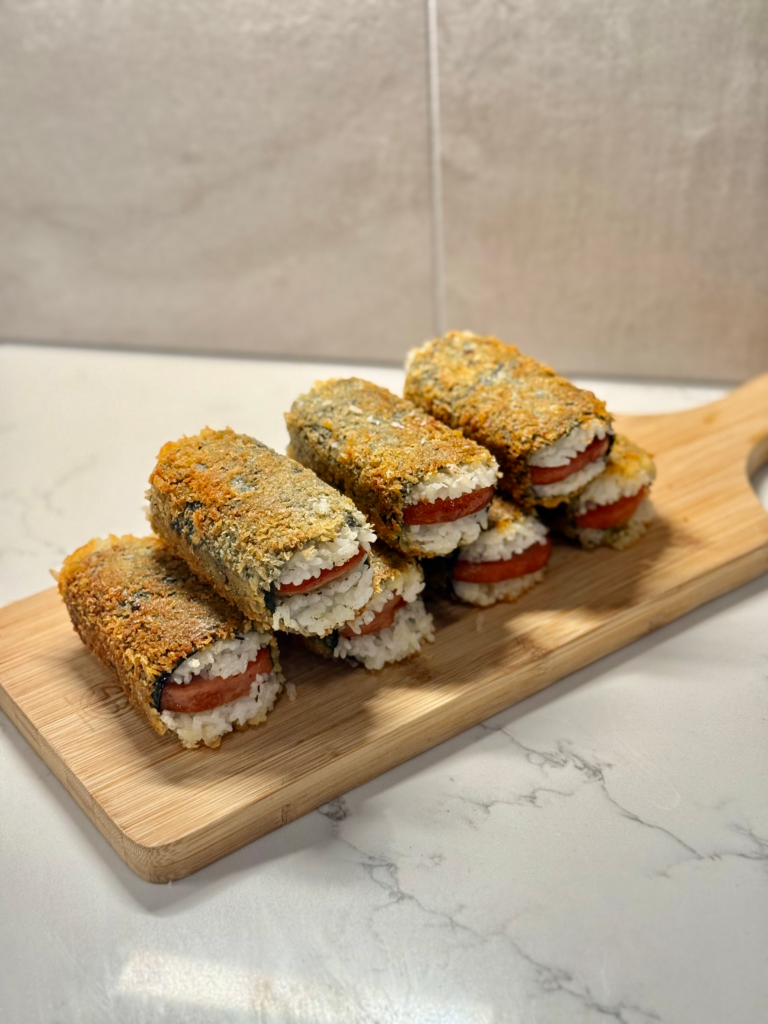
Fast forward to today, and I’ve recreated it at home with a crispy twist. Instead of the traditional chilled or grilled version, this fried crispy spam musubi recipe uses pan-seared Spam for golden edges, then shallow-fries the assembled musubi to create a crunchy nori bottom. It’s the ultimate comfort food with a little extra texture — viral-worthy, deeply satisfying, and surprisingly simple to make.
I’ll also share my DIY trick for creating a musubi mold using the Spam can, though you can easily buy a musubi mold online or in most Asian grocery stores.
Table of Contents
- Why You’ll Love This Fried Crispy Spam Musubi
- Ingredients
- How I Made a DIY Musubi Mold
- Step-by-Step Instructions
- Optional Glaze for Added Flavor
- Tips for Perfect Crispy Musubi
- Serving & Storage
- FAQs
- Printable Recipe Card
1. Why You’ll Love This Fried Crispy Spam Musubi
- Crispy edges and crunchy nori for the perfect bite
- Quick and easy with no breading or deep-frying needed
- Customizable with furikake, egg, or avocado
- Great for lunches, picnics, or road trips
- DIY-friendly with a homemade Spam can mold

2. Ingredients (Makes 8 Musubi)
Main:
- 1 can Spam (12 oz), sliced into 8 even pieces
- Neutral oil for searing and shallow frying (about ½–¾ cup total)
- 4 cups cooked short-grain rice
- 3 full nori sheets, cut into 8 3-4″ strips
Optional glaze:
- 2 tablespoons soy sauce
- 1½ tablespoons sugar
- ½ tablespoon mirin or water
Breading:
- ½ cup all-purpose flour
- 2–3 eggs, beaten
- 1¼ cups panko breadcrumbs
Optional add-ins:
- Furikake
- Sriracha mayo
- Avocado slices
- Fried egg
- Pickled radish
3. How I Made a DIY Musubi Mold
When I made this for the first time, I didn’t have a musubi mold — so I used the Spam can itself.
Here’s how to make a quick DIY version:
- Wash and dry the empty Spam can.
- Carefully remove both the top and bottom using a can opener.
- Line the inside with plastic wrap or parchment paper for easy removal.
- Use it as your mold: layer rice, Spam, and rice again — then press down gently to compact it.
If you prefer, you can also use a store-bought musubi mold, which gives more consistent shapes and makes pressing easier.
4. Step-by-Step Instructions
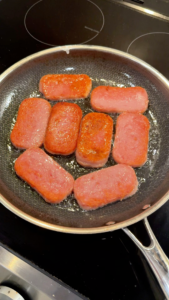
Step 1: Pan-Sear the Spam
- Slice the Spam into 8 even pieces.
- Heat 1–2 tablespoons of oil in a pan over medium heat and sear each piece for about 2–3 minutes per side until golden and crispy on the edges.
- Set aside on a paper towel-lined plate to drain excess oil.
Step 2: (Optional) Make the Glaze
- In a small saucepan, combine soy sauce, sugar, and mirin.
- Simmer for 2–3 minutes until slightly thickened.
- Brush the glaze over the seared Spam slices while warm for a glossy, flavorful finish.
- I usually skip this since Spam is already quite salty, but it adds a nice sweet-savory balance.
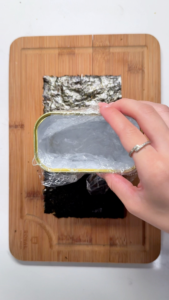
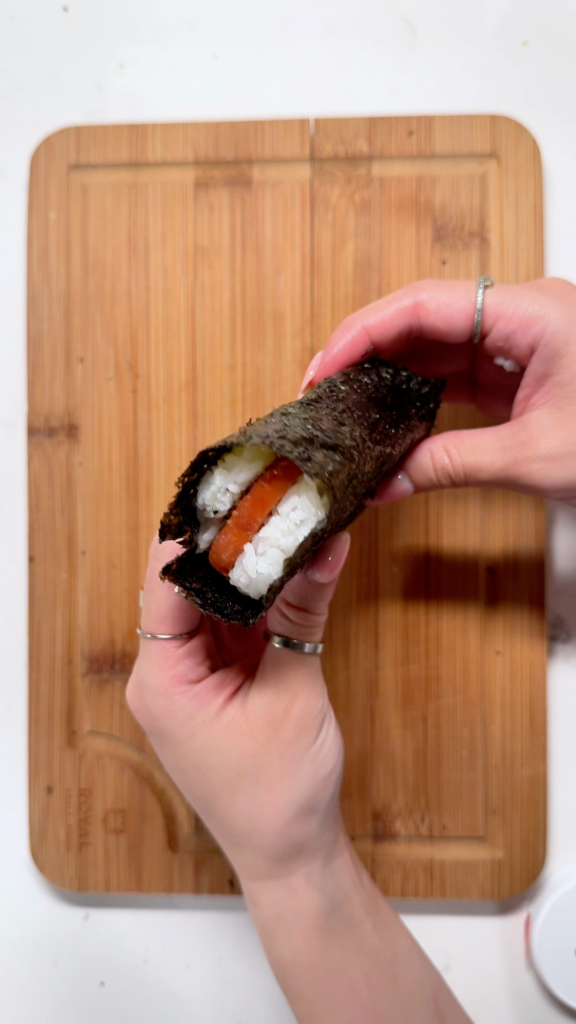
Step 3: Assemble the Musubi (Two Ways)
My Version (Rice-Spam-Rice Sandwich):
- Line your musubi mold (or Spam can) with plastic wrap.
- Add a thin layer of rice and press it evenly to form the base.
- Place one seared Spam slice on top.
- Add another thin layer of rice on top to sandwich the Spam between two rice layers.
- Press down firmly but gently to hold its shape.
- Wrap a strip of nori around the center, sealing the edge with a little water.
Alternate Version (Single Rice Layer):
For a more traditional look, you can press one layer of rice in the mold, place the Spam slice on top, and then wrap it with nori. This version is lighter and shows off the Spam more prominently.


Step 4: Coating and Frying the Spam Musubi
This is where the signature crunch comes in.
- Remove and place on a rack or paper towel to drain excess oil.
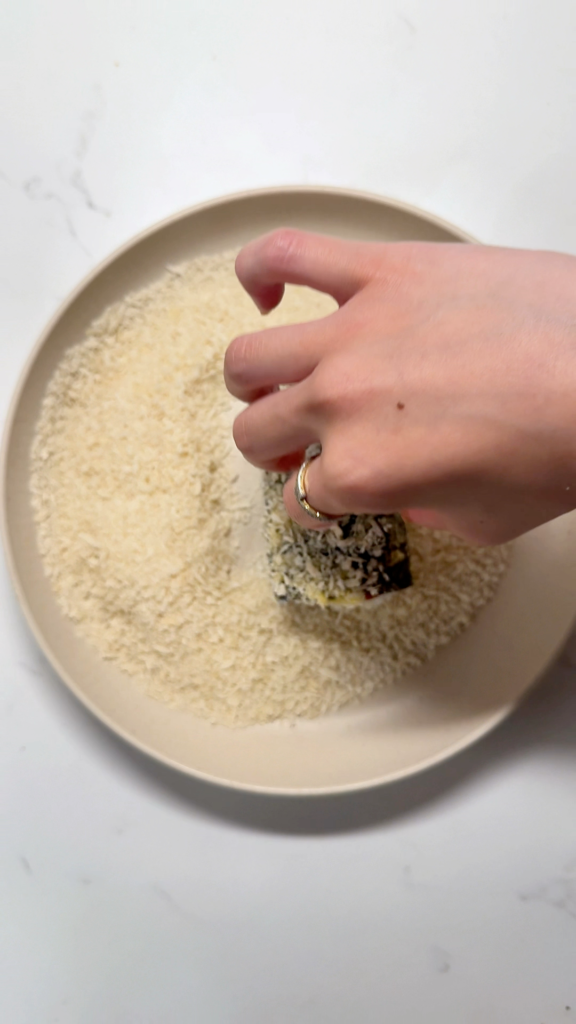
- Prepare three shallow bowls: one with flour, one with beaten eggs, and one with panko breadcrumbs.
- Lightly dredge each assembled musubi in flour, then dip into the egg mixture, and finally coat in panko until fully covered.
- Heat ½ inch of oil in a large skillet over medium heat (about 350°F).
- Fry each musubi 1–2 minutes per side, turning gently until golden and crispy.


5. Optional Glaze or Marinade Ideas
For more depth of flavor, try one of these:
- Sweet Soy Glaze: Soy sauce + sugar + mirin (classic and balanced)
- Spicy Honey Glaze: Soy sauce + gochujang + honey for a gentle kick
- Garlic Teriyaki Marinade: Marinate Spam slices for 15 minutes before searing for a caramelized finish
6. Tips for the Perfect Crispy Musubi
- Press evenly so the musubi holds shape but rice stays fluffy
- Keep the nori seam-side down while frying to seal the wrap
- Use short-grain rice for the best stickiness
- Reheat in a pan, not the microwave, to keep the bottom crisp
- Best enjoyed fresh for the perfect crunchy texture
7. Serving & Storage
Serving ideas:
- Serve as a portable lunch, easy snack, or picnic food
- Pair with miso soup or a light cucumber salad
Storage:
- Store in an airtight container at room temperature for up to 4 hours or refrigerate for up to 2 days
- Reheat in a skillet with a little oil to restore crispiness
8. FAQs
Q: Can I skip the glaze?
Yes — Spam already has a salty, umami flavor, so it’s optional.
Q: How can I make it less salty?
Use low-sodium Spam or rinse the slices lightly under water before searing.
Q: Can I bake instead of pan-fry?
Yes, you can bake at 400°F for 8–10 minutes, but pan-frying gives a crispier result.
Video Tutorial
See the video tutorial below from instagram as a visual guide to help you with this recipe!

Fried Crispy Spam Musubi Recipe (Golden Panko-Crusted Version)
Ingredients
Equipment
Method
- Slice and pan-sear Spam until golden and crispy.
- (Optional) Prepare soy-sugar-mirin glaze and brush over Spam.
- Assemble musubi: rice → Spam → rice again. Wrap with nori and seal.
- Dredge each musubi in flour, dip in beaten eggs, and coat with panko.
- Shallow-fry each side until golden and crispy. Drain on paper towel.
- Serve hot with optional glaze or spicy mayo.
Nutrition
Notes
- Rice: Use freshly cooked short-grain rice (like Calrose or sushi rice). It should be warm and slightly sticky so it presses together easily. Cold rice won’t hold its shape well.
- Spam type: Regular or low-sodium Spam both work. You can also try varieties like Spam Lite or Spam Teriyaki for a different flavor.
- Musubi mold: If you don’t have one, make a DIY version by cutting both ends off your Spam can and lining it with plastic wrap. It presses perfectly into shape.
- Oil temperature: Keep oil around 350°F (175°C) for an even golden crust. Too cool and the musubi will absorb oil; too hot and it will brown before heating through.
- Glaze: The soy-sugar-mirin glaze is optional, but adds a delicious sweet-savory finish. Brush it on the Spam before assembling or drizzle it over the finished musubi.
- Frying tip: Coat evenly with flour, egg, and panko. Gently press panko onto the surface so it adheres well before frying.
- Storage: Best served immediately, but you can refrigerate leftovers for up to 2 days. Reheat on a skillet over medium heat to restore crispiness.
- Serving ideas: Serve with sriracha mayo, kewpie mayo, or pickled radish on the side.
- Equipment I use: My go-to nonstick frying pan, Japanese panko, and musubi mold (linked above) make this recipe foolproof.
- Make-ahead option: You can sear the Spam and form the musubi in advance. Bread and fry them right before serving for the crispiest texture.


 – Ultimate Street Food Comfort at Home")
")